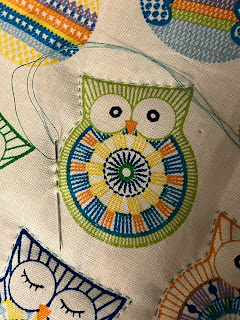
In this hand-quilting lesson, we're quilting a simple print. I need to practice making videos, so I hope you don't mind that I've included a quick video for this lesson. I was nervous when I made the video, so below the video, I have provided written details for you to print out or to follow along with as you quilt. If you haven't read my previous posts about hand-quilting tools or layering and basting tutorial before this, you will want to do that before proceeding with this lesson.
- All you need is a print that you can easily quilt around. Spray-baste the print onto batting and back fabric (solid or print).
- The batting and backing should be 1 1/2 to 2 inches longer than the top print around the edges so you can use it for binding the quilt later. I said 1 inch in the video and wanted to clarify that. AFTER quilting, we will trim that longer edge to within 1 inch of that shorter quilt top edge. That information will be provided in the binding lesson later this week.
- You can lay the quilt on a flat surface to hand quilt it. However, for easier quilting, place the 3 layers of your quilt into a quilting hoop. I like to keep the fabric loose inside the hoop, because that helps me go through the quilting process more quickly. I show you how I do that in the video.
- You will need a "sharp" quilting needle and hand-quilting or all-purpose thread.
- Knot the end of the thread by holding about 1 inch of the thread along the side of the needle. Wrap the thread around the needle about 4 times. Hold the section you wrapped and push the needle through the wrapped section. And the end of the thread will be knotted. Cut off the excess thread that extends beyond the knot.
- Insert the needle about three-quarters of an inch from the location you want to start quilting. The needle should be inserted behind the batting but not the back fabric for this part. So, it's between the batting and back fabric. Pull the needle through the front fabric near the print you want to quilt around.
- Pull the knot through the fabric. The batting will hold the knot in place as you gently pull the thread through.
- Begin quilting. You will make small stitches - about 2 millimeters long. These won't be precise - just close. You're hand quilting! The inconsistencies are what makes a hand-quilted quilt unique, beautiful, and cherished. Insert the needle through all layers.
- Raise the needle in the back of the quilt so you can see its position on the back. Pull the needle towards the stitch you just placed. When the raised needle is about 2 millimeters from the last stitch, push the needle through to the front.
- The loosely fitting fabric will allow you to repeat this process 3 or 4 times before you pull the thread through. The picture below shows this detail.
- Once you're finished quilting around a print, you will knot off your thread when you're finished - or when you run out of thread.
- Place your last stitch, then go through the back end of that stitch again.
- Wrap the thread around the needle 2 times. Push the needle into the front of the stitch you're finishing with. The needle will be inserted behind only the batting once again for this process.
- Push the needle through the front fabric about three-quarters of an inch from the insertion point.
- Hold the thread tightly around the needle. Pull the thread through the 2 layers, making sure the knot pulls through as well. The knot should be hidden between the fabric layers.
- Cut enough of the excess thread away so it won't show on top of your quilt. Do this carefully so that you don't cut your quilt top.
I have provided wider views of the owl quilt below so you will have a better idea of what the ongoing process looks like.
#quilting
#womenhelpingwomen
I hope this lesson has been helpful. Have questions? Please don't hesitate to email me. I'll be happy to help.
Have a blessed day,
Patricia


Comments
Post a Comment
Thank you for taking time to leave a comment. Your comment will be published after it has been moderated. All SPAM is deleted by Blogger.